Design Room ONE User’s Guide
With Design Room ONE you can export your models to a server. By doing so it becomes possible to view the models in a web browser without having the modeling tool installed. Supported modeling tools include: Devops Model Architect (DMA), Rational Software Architect Designer (RSAD), Rational Software Architect RealTime Edition (RSARTE) and HCL RTist. You can also create links to elements of an exported DMA/RSAD/RSARTE/RTist model from artifacts of Jazz CLM tools and other OSLC-compliant tools. For example, you can create a link from a requirement in DOORS NG to a use case in your model, to express the fact that the use case specifies the requirement.
With Rational Publishing Engine, you can create reports that contain data from Design Room ONE. If the elements have links to OSLC artifacts these can also be included into the report.
Contents
Page
1: Setup a server connection
Page
2: Select model projects to be exported
Page
3: Specify additional export settings.
Troubleshooting
Problems When Exporting Models
Navigating
from Diagram Elements
Web
URL of a Model or Diagram Element
Associating
a Jazz Project Area with a Design
Viewing
and Navigating to the Target of a Link
Exporting
Requirement Links from DMA/RSAD/RSARTE/RTist
Exporting a
model
To get started, the first thing you need to do is to export a model to a Design Room ONE server. This is done by means of an Export wizard in DMA/RSAD/RSARTE/RTist.
In DMA/RSAD/RSARTE/RTist open File - Export - Modeling - Design Room Model:
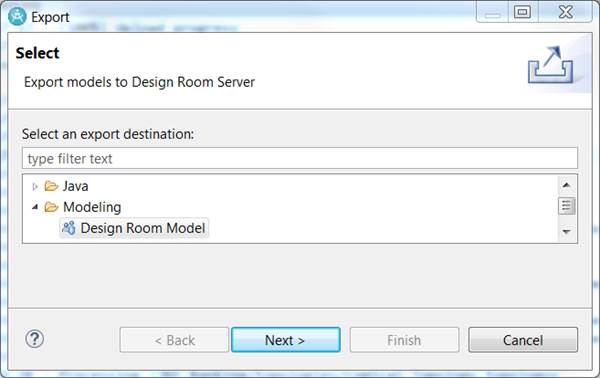
If you don’t see this exporter you probably did not install the Design Room ONE Integration plugin yet. Refer to the installation instructions for how to do that.
The Export wizard contains a few pages for specifying which parts of the model to export, and how to access it on the Design Room ONE server.
Page 1: Setup a server connection
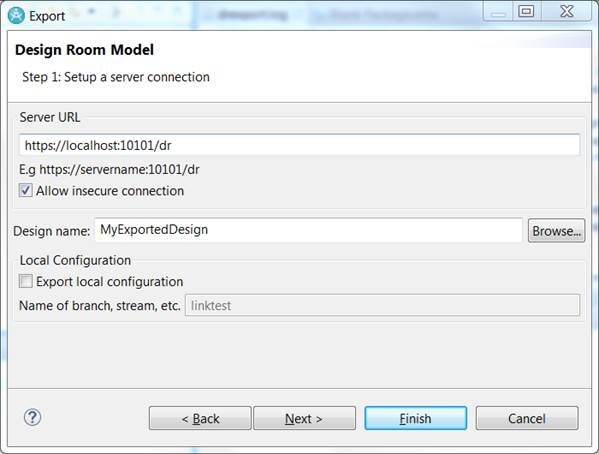
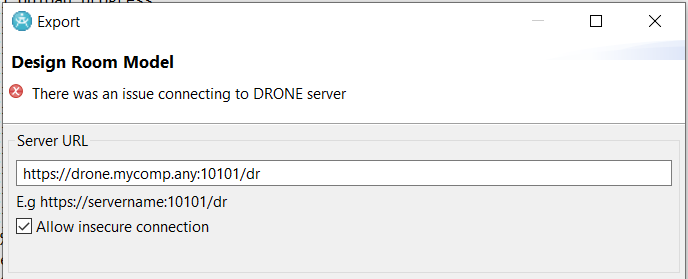
On this page, you need to provide the URL to the Design Room ONE server (refer to the installation instructions for how to install and start the server). If the server is running with default settings locally, on the same machine where RSAD/RSARTE/RTist runs, the URL would be:
If your Design Room ONE server uses a self-signed certificate (or some other certificate that is considered insecure), you must mark the checkbox Allow insecure connections to be able to connect to the server.
You also need to provide a name for the exported design. Design Room ONE uses the term design to denote a set of exported models. It is similar to the workspace concept in RSAD/RSARTE/RTist, but there is usually not a direct mapping between workspaces in the modeling tool and designs on the Design Room ONE server since it is common to only export a subset of the model projects that are present in the RSAD/RSARTE/RTist workspace. Names of different designs should be unique on the Design Room ONE server. Use the Browse button to check what other designs that are already present on the server.
You can also specify to export a local configuration. This is the name of the currently active local configuration in your SCM system for the exported model. For example, you can specify the name of a branch in Git or the name of a stream in RTC. You can also use another name that is meaningful to you and that describes the current version of the exported model. The combination of a design name and a local configuration name uniquely identifies the exported design, and must therefore be unique. Exported designs with the same name, but different local configuration, should be used for different versions of the same design.
If the chosen design name (and local configuration name, if specified) already exists on the server, that design will be updated with the contents of the exported models. This is useful if you made changes to a model that was previously exported, and now want to update the exported design to contain those changes. If you instead prefer to export a new version of the existing design, make sure to specify a different local configuration for it.
Page 2: Select model projects to be exported
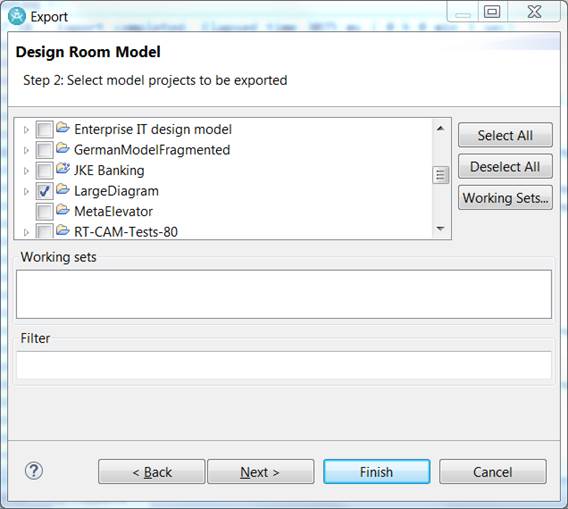
On this page, you specify which model projects in your workspace that should be exported to Design Room ONE. If you launched the export wizard by right-clicking on a model project in the Project Explorer, and then performed the Export context menu command, that model project would already be marked in the list. Otherwise you need to mark the projects yourself.
If you have working sets in your workspace for grouping related projects, you can use the Working Sets button to specify the projects to export by selecting one or many working sets. In that case the working sets themselves will also be exported to the Design Room ONE server. This makes it possible to use them also when later viewing the exported model in a web browser.
The Filter box is for excluding certain parts of the selected models from being exported. However, the syntax for specifying excluded elements are still under development, so for the moment this feature should only be used in case of troubleshooting (in cooperation with HCL).
Page 3: Specify additional export settings
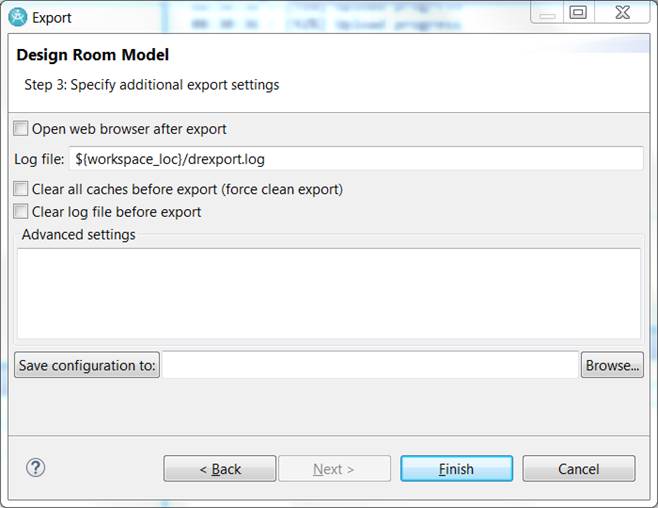
The third wizard page contains a few additional export settings. Note that this page is optional, and you can skip it by pressing Finish already on the second page (actually, also the second page is optional if you launched the Export wizard from the context menu).
·
Open web
browser after export
If set, the web browser specified in Eclipse will be opened to show the
exported design in the Design Room ONE web application after the export has
finished.
·
Log file
This preference allows you to specify to which file the exporter will print
diagnostic messages. It can be useful to look in that file in case something
unexpected happens during the export.
·
Clear all
caches before export (force clean export)
To get good export performance some information about an exported model is
cached in the Eclipse workspace metadata. If an exported design appears to have
obsolete information in the web application, you can try to mark this checkbox
to clear the caches. This makes the export take longer.
·
Clear log
file before export
Set this preference to clear the log file from messages before starting the
export. It can be good to set this preference if you perform lots of exports so
that the log file becomes very long.
·
Advanced
settings
This field can be used for specifying advanced settings. It’s mostly for
internal use only, and you only need to use it if you are advised to do so to
resolve problems that may occur during the export (see Troubleshooting Problems When Exporting
Models).
Automated Export
The data you enter in the Export wizard is saved in your workspace, so you don’t have to re-enter everything the next time you want to export a model to Design Room ONE. However, if you need to export the same or different models on a regular basis, you should consider automating the export procedure using an Ant script. Here is an example of such an Ant script:
<project name="automaticExportToDesignRoom" default="export" basedir=".">
<target name = "export">
<com.hcl.design.room.exporter.ui.exportModelsTask
configuration="C:\temp\config.xml"
importFrom="C:\RSA_DR_workspace\JKE Banking">
</com.hcl.design.room.exporter.ui.exportModelsTask>
</target>
</project>
The Ant task com.hcl.design.room.exporter.ui.exportModelsTask accepts the following parameters:
·
configuration
Specifies a configuration file that contains the export settings. You can
create this file from the Export wizard by clicking the Save configuration to button on the third wizard page.
![]()
·
importFrom
Specifies a directory from which projects can be imported to the workspace
before exporting them to Design Room ONE. Use of this parameter is optional and
you can omit it if your workspace already contains all projects to be exported.
·
imageCache
Specifies a directory to be used as cache for diagram image generation. Use of this
parameter is optional and if you omit it a directory in your workspace metadata
will be used (the same as if you would run the export manually from the Export
wizard).
To avoid hardcoded paths in the Ant task parameters you may use the following variables:
·
${ENVVAR}
Expands to the value of an environment variable ENVVAR.
·
${workspace_loc}
Expands to the location of the current workspace.
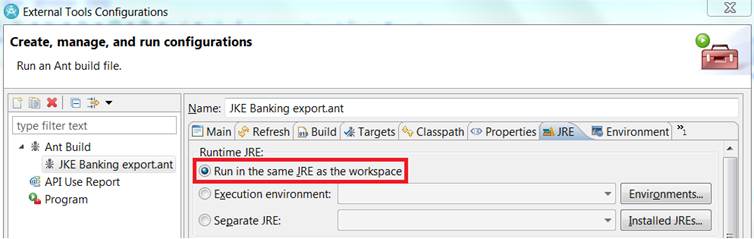
If you want to run the Ant script from within RSAD/RSARTE/RTist (for example, in case you need to debug it) you can just add it to a project and run (or debug) it as an Ant Build. Ensure that the setting “Run in the same JRE as the workspace” is set in the launch configuration.
If you want to run publishing task in RSAD from command line
you must use application id org.eclipse.ant.ui.antRunner. To run publishing task in
RSARTE/RTist from command line you must use application id com.hcl.design.room.exporter.ui.DRExporter. Check Automated Export to Design Room ONE document
for details.
In addition to running your export Ant script manually, it
can be useful to run it automatically either according to a schedule (for
example nightly) or based on when a change is delivered in your SCM system.
Refer to the documentation of your SCM system for how to listen for such
notifications. Automated Export to Design Room ONE
and this
video show how notifications from GIT can be used to trigger exports.
Troubleshooting Problems When Exporting Models
If the following problem is reported when connecting to Design Room ONE server
One of the possible reasons could be that the modeling tool is configured to use TLSv1 and Design Room ONE server requires TLSv1.2. Please refer to “Configure HTTPS” section of the Installation instructions document for options to resolve it.
If problems occur during export of a model to Design Room ONE, you will be notified with a warning dialog:
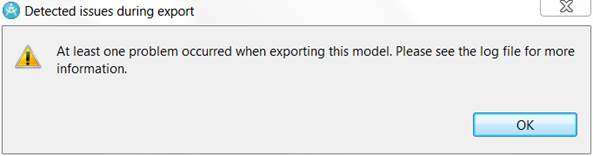
You should then look in the exporter log file to learn more about the problem(s) that occurred. Search for the words “WARNING” or “ERROR” to find the problems in the log file.
One common problem is that elements in the DMA/RSAD/RSARTE/RTist model may not have unique IDs. The reason for duplicate IDs could for example be that the model was created by copying model files in the file system. The result of exporting a model that contains elements with duplicate IDs is that some elements will be missing when you browse the exported design in Design Room ONE.
RSAD/RSARTE/RTist provides a command Modeling – Fix Duplicate Identifiers that can be used to fix such problems. If you don’t want to change the IDs in your model you can instead set a preference when exporting so IDs are generated in a different way that makes them unique. Enter the line below in the Advanced settings field on the last page in the Exporter wizard:
JE.setIDMode("URI");
The exporter will then use the full URI of elements to
generate their IDs in Design Room ONE. Note, however, that since the URI
contains the path to the model file, the ID will change if you refactor your
model in DMA/RSAD/RSARTE/RTist. So, for example, you should avoid refactoring
elements that you target with OSLC links, as these links would then become
broken after the refactoring.
A special kind of export problem occurs when the Design Room ONE server is not compatible with the Design Room ONE Integration plugin that has been installed in DMA/RSAD/RSARTE/RTist. In this case you will get an error message and cannot export the model.
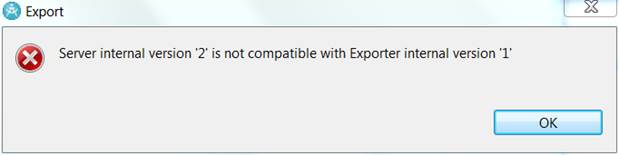
You must then either switch to another Design Room ONE server, or update DMA/RSAD/RSARTE/RTist with a newer version of the Design Room ONE Integration plugin. A good way to avoid this problem is to ensure that you always install the Design Room ONE Integration plugin from the Design Room ONE server you will export the model to. See the installation instructions for more information.
Browsing an Exported Design
Shortly after you have exported a design to the Design Room ONE server, you can view it in a web browser. Take the URL that you used when exporting the model in DMA/RSAD/RSARTE/RTist and append ‘/web’. For example:
https://localhost:10101/dr/web
The Design Room ONE web application will appear. It will look like this (screen shot from Firefox):
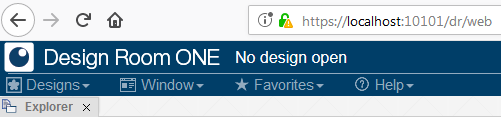
Note the small security warning icon in the address field that shows that the web server uses a self-signed certificate. You would not see this if you have configured the web server to use a trusted certificate.
Open the Designs menu and perform the command Open. A dialog appears, showing the list of designs that are available on the server:
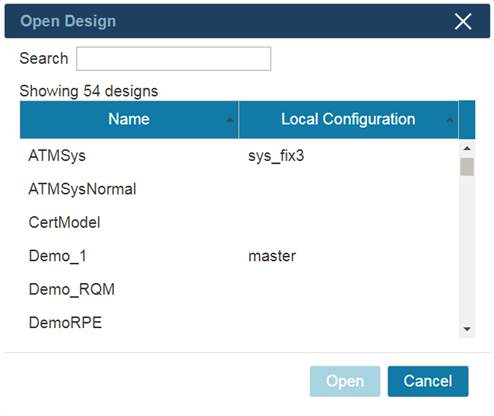
Note that the Local Configuration column is only shown if there is at least one design with a local configuration.
You can use the Search field for filtering the list of designs, either on name or local configuration. Type a few characters and the list will be filtered to only show designs with names or local configurations containing those characters. Press the Open button to open the selected design.
|
Note! Your
administrator may have configured the Design Room ONE server so that it
requires authentication before you can open a design. In that case you will
see an error message in the Open Design dialog that tells you to first login.
When the server is configured to require authentication, several features in
Design Room ONE will not work until you have logged in. Currently only Jazz
authentication is supported. See this
chapter for
more information about how you can login to Jazz. |
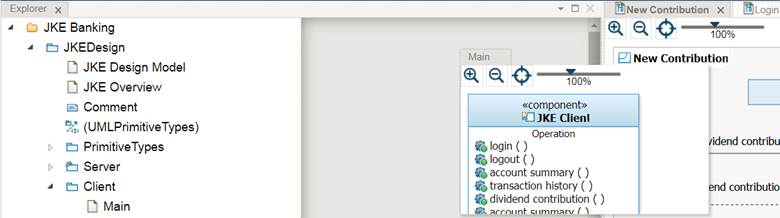
Explorer View
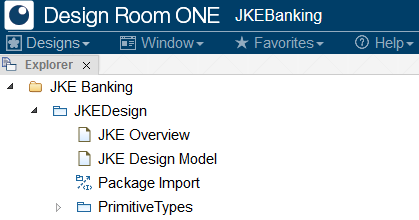
The Explorer view shows all the projects that are contained in the design (i.e. the ones you selected when exporting the design). This view is hence similar to the Project Explorer view in RSAD/RSARTE/RTist. For example:
By default, the Explorer view is organized to show the projects as root nodes. However, if the design contains exported working sets you can use the “view menu” to switch to instead using working sets as the root nodes.
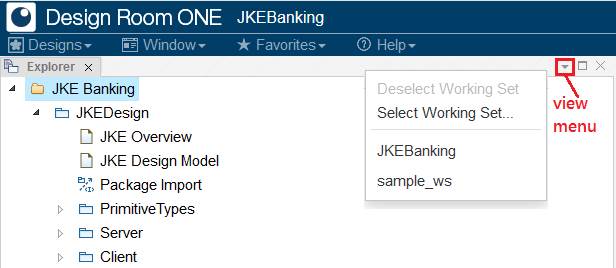
The view menu shows all available working sets. It also contains a command Select Working Set which can be used if you want to activate multiple working sets. To go back to the default mode of showing the projects as root nodes, perform the command Deselect Working Set.
Browsing the design in the Explorer view is very similar to using the Project Explorer in DMA/RSAD/RSARTE/RTist. You can expand and collapse nodes using either the mouse or the keyboard. You can navigate by typing the first character of an element, and if you want to search for a particular node you can use the search capability of the web browser. However, the web browser search can obviously only find Explorer nodes that are currently expanded. To find nodes with a certain name in a collapsed Explorer view, use the Search feature.
|
Note! The contents of the Explorer view in
Design Room ONE may differ from what is shown in the Project Explorer in the
modeling tool. In DMA/RSAD/RSARTE/RTist you can set various preferences to
control which nodes to show, and how to sort them. Design Room ONE currently
only implements the default filtering and sorting of DMA/RSAD/RSARTE/RTist. This
means that if you have not changed preferences in the modeling tool related
to filtering and sorting, the contents of the views should be very similar.
Note that just like in DMA/RSAD/RSARTE/RTist the alphabetical sorting depends on
your regional language settings (locale). In Chrome and Firefox
you specify the language to use in the browser preferences, while Internet
Explorer uses the regional settings defined by Windows. |
Just like in DMA/RSAD/RSARTE/RTist you can select multiple elements in the Explorer view by clicking while holding down the CTRL or SHIFT key. Most commands in Design Room ONE apply also when more than one element is selected (the commands will then operate on all selected elements).
Properties View
You can view properties of an element that is selected in the Explorer view by using the command Window – Show Properties. The Properties view shows properties of the selected element in a similar way as the Properties view in DMA/RSAD/RSARTE/RTist. If multiple elements are selected, the Properties view just shows how many elements that are selected (properties can only be shown for one element at a time).
Tabs are used for organizing the properties into categories. Here is an example:
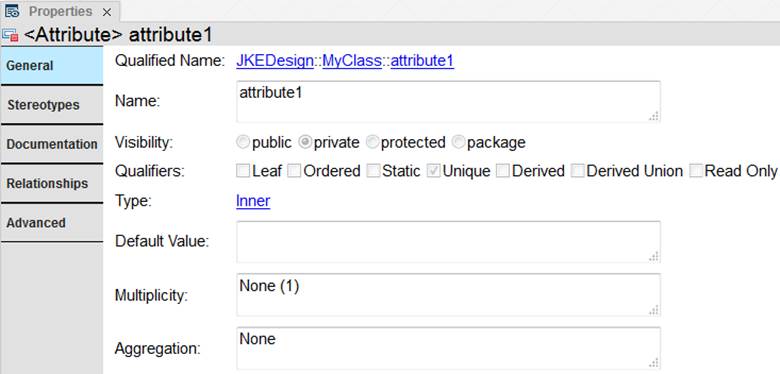
Exported models are read-only in Design Room ONE, so you cannot change the properties shown in the Properties view. Another difference compared to the Properties view in modeling tools is the “Id” property which appears in the Advanced property tab for all elements. It shows the unique identifier for the element on the Design Room ONE server that was assigned when exporting the model from DMA/RSAD/RSARTE/RTist. The ID remains unchanged if you re-export the model.
Properties that are references to other model elements appear as hyperlinks in the Properties view (see “Type” and “Qualified Name” in the previous picture). You can click such hyperlinks to navigate to the referenced element in the Explorer view. Of course, this will only work if the referenced element belongs to the same design.
If an element has stereotypes applied a different visualization is used compared to DMA/RSAD/RSARTE/RTist. Each applied stereotype will have its own tab in the Properties view showing the values for stereotype attributes (a.k.a tagged values). Here is an example of an element which has a «Link» stereotype applied. The stereotype is located in a profile called “Profile1”, and it has two attributes (“iconPath” and “isOpen”).
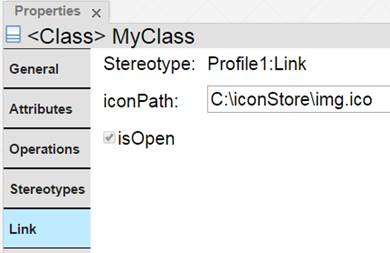
Note that the custom user interfaces that DMA/RSAD/RSARTE/RTist support for editing some stereotypes are not available in Design Room ONE.
Diagrams
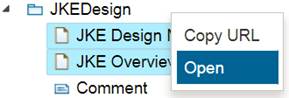
To open a diagram, double click it in the Explorer view. You can also open diagrams by right-clicking on them and perform the Open command from the context menu. This can be useful if you want to open multiple diagrams at the same time.
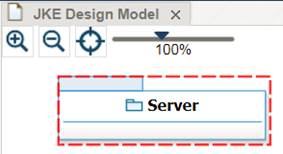
The opened diagram appears in its own view, and provides buttons for zooming and panning the diagram. Here is an example:
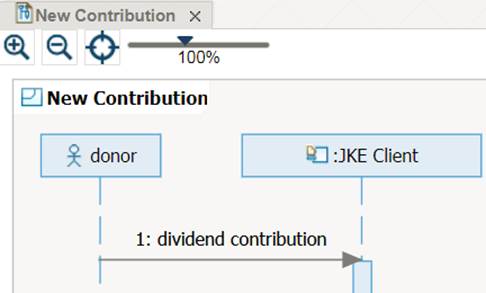
You can also zoom the diagram by using the mouse scroll wheel or drag the zoom slider. A custom zoom level can be set by directly editing the percentage number shown below the zoom slider. To pan the diagram so you can see more of it, just hold down the mouse button in the diagram and drag with the mouse. If you happen to pan it too far you can use the Center button to return to the default panning position.
Like everything else in Design Room ONE, diagrams are read-only. However, they are not embedded images but instead SVG documents, which means that all texts they contain can be searched using the search capability of the web browser. This can be useful in order to find something in a big diagram.
You can select symbols and lines in a diagram to view properties of the model elements they correspond to. Select a symbol by clicking within its boundaries. A black dashed outline shows which symbols that can be selected. Only symbols that have a corresponding model element can be selected. To select a line, you need to click on the text label for the line. Currently it’s not possible to select lines that do not contain any text labels.
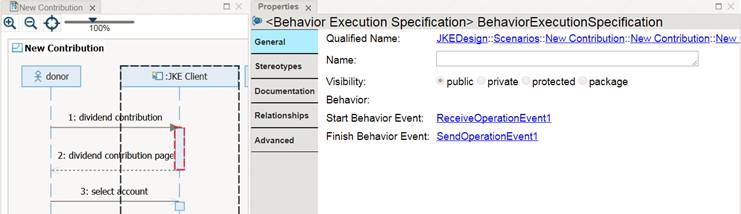
In the above example the selected symbol (red outline) corresponds to a BehaviorExecutionSpecification in the model, the properties of which are shown in the Properties view. We can also see that the mouse is currently over a lifeline symbol and its black dashed outline shows that this symbol can be selected. Note that a lifeline symbol is not just the head of the lifeline, but extends vertically all the way to the end of the sequence diagram. This makes it easier to select a lifeline without scrolling to the top of a big sequence diagram.
If you want to select multiple symbols and lines on a diagram, hold down the CTRL key when clicking to select. Click in the diagram background if you want to reset the selection.
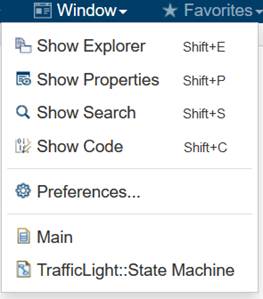
You can open multiple diagrams. By default, they will appear “stacked” next to each other so that only one at a time is visible.
Click the tabs to make other diagrams visible. You can also use the Window menu for choosing which diagram to make visible. All open diagrams appear at the end of this menu:
Navigating from Diagram Elements
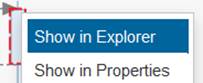
You can use commands in the context menu of symbols and lines on diagrams to show the corresponding model element in the Explorer and Properties views.
Of course, these commands only work if the diagram element represents a model element that is part of the currently open design.
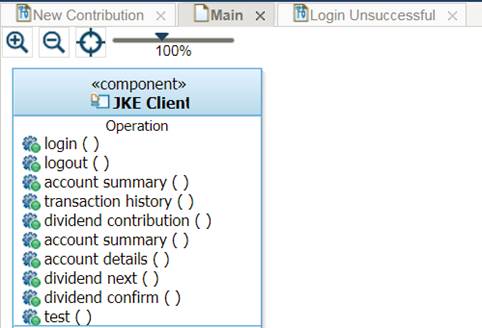
It is also possible to navigate from a symbol to a diagram that is contained in the corresponding model element. This is done by double-clicking on the symbol. If the model element of the symbol has a diagram as its immediate child element, that diagram will be opened. If there are multiple diagrams, the first one will be opened. For example, double-clicking on the package symbol ‘Server’ in the diagram below, will open the diagram ‘Server Main’.

Code View
If the exported model contains source code (which is typical in RSARTE or RTist models, but less common in RSAD models) you can use the Code view for looking at the code in Design Room ONE. Open the Code view by using the command Window – Show Code. The Code view shows all code snippets that are associated with the element that is selected in the Explorer view or in a diagram. Each code snippet is shown in a separate tab, in a very similar way how the Code view works in RSAD/RSARTE/RTist.
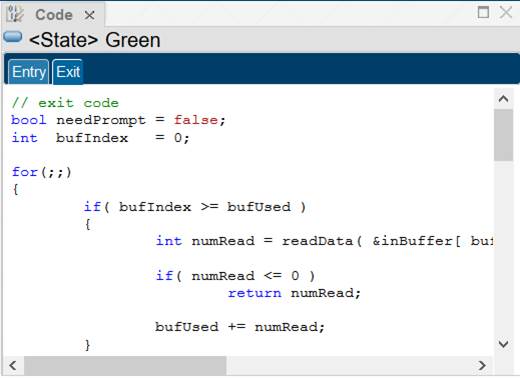
Note that only non-empty code snippets are shown in the Code view. This is a difference compared to RSARTE/RSAD/RTist since when editing the model you need to see also empty code snippets in order to change them. In Design Room ONE, however, empty code snippets would just take up unnecessary space in the Code view and are therefore hidden.
Web URL of a Model or Diagram Element
Each model element and diagram element in a Design Room ONE design can be uniquely identified by a URL. Pasting such a URL in a web browser will open Design Room ONE and navigate to the model element in the Explorer view. For a diagram element URL an additional navigation will take place, where the diagram is opened and the diagram element is selected on the diagram. We call these URLs web URLs since they are intended to be used in a web browser. For example, you can send a web URL to someone that you want should take a look on a particular model element or diagram element.
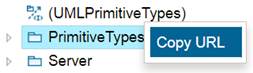
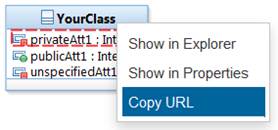
The easiest way to get the web URL of a model element is to use the command Copy URL that is available in the Explorer view context menu. It copies the web URL of the selected element to the clipboard. Note that some web browsers may require your confirmation to write to the clipboard.
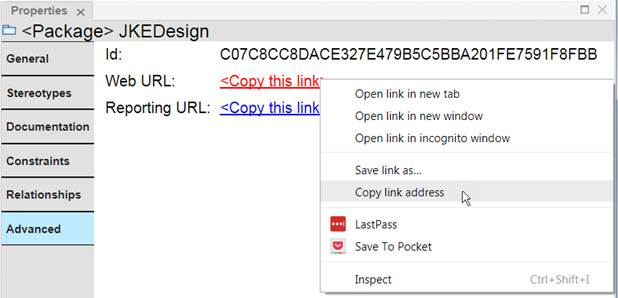
Another alternative is to look on the Advanced property tab where the web URL of the selected element is shown and copy it using the context menu of the web browser.
The web URL of a diagram element can be obtained using the Copy URL command from the diagram element context menu.
Search
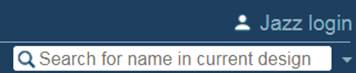
You can search for model elements, diagrams and projects by their names. Type the name in the search field in the upper right corner:
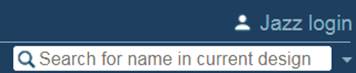
Press Enter to perform the search. The Search view appears and shows all model elements, diagrams and projects with matching names.
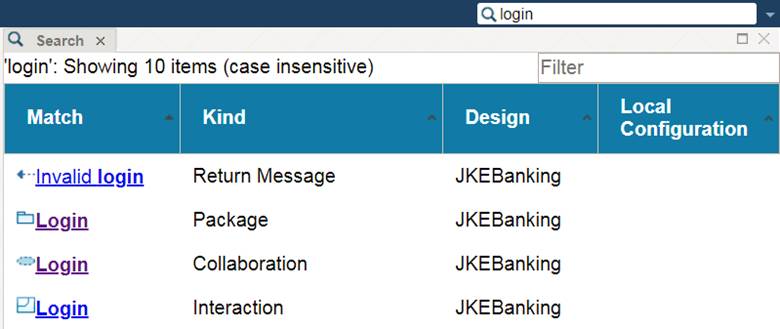
Click the hyperlink in the Match column, or double-click anywhere on the table row, to navigate to a found element in the Explorer view. You can right-click the hyperlink and copy its URL or open it in a different browser tab. This can be useful when navigating to an element that belongs to a different design to avoid unloading the design that is currently open.
If you have the Properties view open, you can select a line in the Search view table to view the properties of the corresponding element. That is, it’s not necessary to first navigate to the element in the Explorer view if you just want to view the properties of the element.
As can be seen in the picture above, the search string does not have to match exactly. Even if it only matches part of an element name (as for the Return Message above) the element will be included in the search result. The matched part of the element name is marked in boldface.
You may use two special characters (wildcards) in the search string to let it match certain name patterns:
· * Matches zero to many arbitrary characters
· ? Matches exactly one arbitrary character
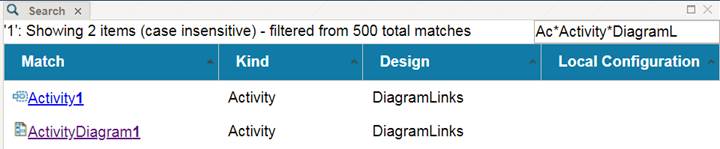
For example, the search string ???Class will match elements with names ABCClass or 123Class but not MyClass. And the search string Test*Server*Log will match elements with names TestingServerLog and TestServerFileLog, but not TestServLog. You can use any number of wildcards in the search string.
If you get more than a few matches from a search it can be useful to filter the search result. To do so type a few characters in the Filter field in the Search view. Only those search result items that contain those characters (in any column) will remain visible – others will be filtered out from the view. For example, filtering can be useful if you only are interested in certain kinds of matches, such as packages or classes, or only matches found in a certain design. The filter string may contain the same wildcards as can be used in the search string. Here is an example:
The filter is interpreted as case sensitive if the search is case sensitive (see Search Options).
Another way to help find the most interesting search result items could be to sort the items by clicking on the column headers.
Search Options
Press the small triangle button to the right of the search field to view and change search options.
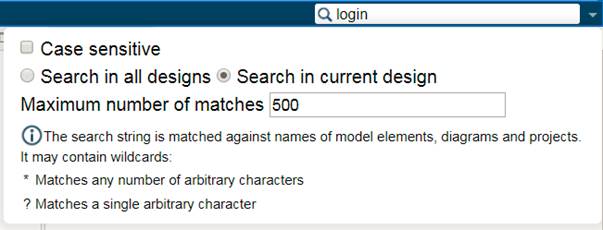
By default search is performed without considering the case of the search string. That is, the search string login will match both login, Login and LOGIN. Mark the Case sensitive checkbox to instead do case sensitive matching. This option also affects the interpretation of the filter string.
The scope of a search is by default the design that is currently open. Click on Search in all designs if you instead want to search in all designs that are present on the Design Room ONE server. Note that if you perform a search when no design is currently open, the scope will always be all designs.
For performance reasons the maximum number of matches is limited. The limit is 500 by default, but you can raise it to 1000 at the most. Setting a lower limit improves the performance of searching, and usually it is anyway not practical to go through too many search result items in the Search view.
View Management
Design Room ONE views (Explorer, Properties, Search and diagrams) can be arranged in a similar way as in RSAD/RSARTE/RTist. You can click on the header tab of a view and, while holding down the mouse button, move the view to another location within the browser window. A gray area will show you the suggested new position of the moved view.
You can resize a view by moving the cursor near the edge of
a view, until it changes from a “pointer arrow” (![]() )
to a “move arrow” (
)
to a “move arrow” (![]() ).
Then just click and drag to resize the view. Use
the maximize button (
).
Then just click and drag to resize the view. Use
the maximize button (![]() ) to automatically resize a view so it fills up all
available space in the browser window, and use the close button (
) to automatically resize a view so it fills up all
available space in the browser window, and use the close button (![]() ) to close a view that you no longer need open. If you
by mistake close the Explorer, Properties or Search views you can open them
again from the Window menu.
) to close a view that you no longer need open. If you
by mistake close the Explorer, Properties or Search views you can open them
again from the Window menu.
Moving, resizing and closing
views helps to utilize the available space in the browser window as efficiently
as possible. For example, the Properties view can be moved below the Explorer
view to give more space for diagrams. And you can arrange the diagram views to
have more than one open diagram visible at the same time.
With lots of views open at
the same time it can sometimes be difficult to find the one you are looking
for. Use the commands available in the Window menu to highlight one of the open
views. The view that was most recently highlighted will have its title printed
in bold text.
Favorites
You can mark interesting elements as favorites to make it easy to quickly find them. Select one or many elements in the Explorer view or in a diagram and perform the command Favorites – Add Selection. The selected elements will be added as favorites and appear in the Favorites menu. For example:
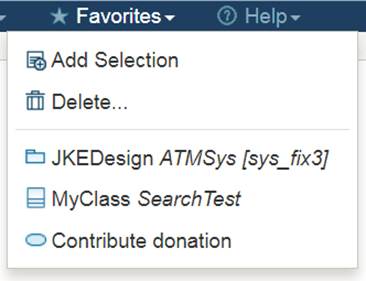
You can add favorites from different designs. For favorites that belong to a different design than the one that is currently open, the design name is shown in italics after the element icon and name. If the design has a local configuration, it’s shown in square brackets after the name. You can navigate to a favorite simply by clicking on it in the Favorites menu. Note that favorites are hyperlinks, so you can right-click on them and copy their URL or open them in a different browser tab. This can be useful when navigating to favorites that belong to a different design to avoid unloading the design that is currently open.
You can remove favorites from the Favorites menu using the Delete command.
When you add a diagram element as a favorite its diagram name is included in the favorite description. This makes it possible to distinguish the cases when both a diagram element and its corresponding model element have been added as favorites:
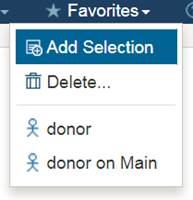
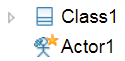
When a model element is added as a favorite it gets marked with a small golden star in the Explorer view.
Favorites are stored in a web browser cookie. This means you can only access them as long as you don’t clear your browser cookies, or switch to another web browser or computer. If you want to maintain a more permanent list of favorites, you can copy the URL of the favorite element and store it outside of Design Room ONE.
Keyboard Shortcuts
Most commands in the Design Room ONE web user interface can be accessed using keyboard shortcuts. To learn about available shortcuts, perform the command Help - Keyboard Shortcuts (as can be seen in the Help menu, the shortcut for this command is ‘?’).
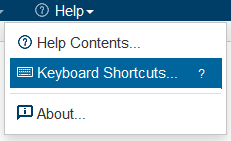
A dialog appears, showing all available shortcut keys. Note that some shortcuts apply globally, while others only apply when a particular view is active.
Setting a Custom Language
Your administrator has specified a default language for Design Room ONE when the server was deployed. If he or she didn’t specify a default language it is English. However, if you prefer to use a different language you can do so by setting a browser cookie. The easiest way to set this cookie is to append the query parameter lang=<language> to the browser URL.
For example, this URL will switch the language to French:
https://localhost:10101/dr/web?lang=fr
See the installation instructions (chapter "Change the Default Language") for a list of supported languages.
Note that the ‘lang’ parameter only sets the language to use for the application strings. You can also set a language in the preferences of the web browser (Chrome and Firefox) or in the Windows regional settings (Internet Explorer). This language defines the locale, i.e. other regional settings such as formatting of dates and rules for how strings are sorted. Normally you use the same locale that belongs to the selected language, but in some cases you may want to use a different one (for example use English application strings, but Swedish regional settings).
Design Administration
Use the command Designs - Administer to view all designs that are currently available on the Design Room ONE server. If there are many designs available, you can use the Search field for filtering the list:
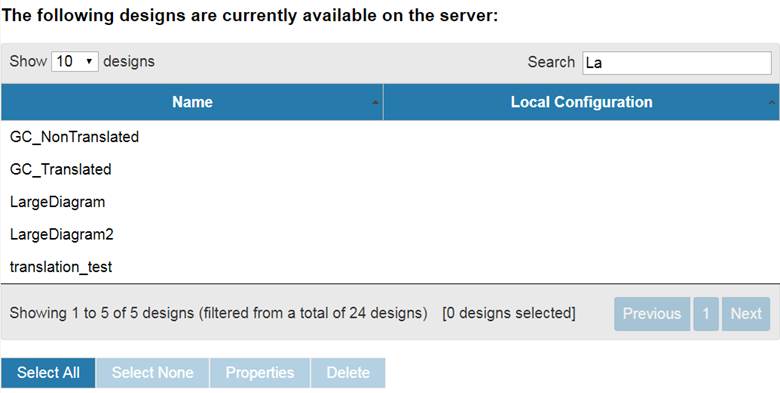
Select one or many designs from the list and then click one of the buttons below:
·
Properties
View properties of the selected design. Currently only the name, ID and local
configuration of the design is shown.
·
Delete
Deletes the selected designs from the server. Note that this operation
cannot be undone, and there is no way of getting back a deleted design other
than to export it once again from DMA/RSAD/RSARTE/RTist. A confirmation dialog will
appear before the designs are deleted from the Design Room ONE server. If you
have OSLC links to elements in the deleted design, those links will become
broken.
OSLC Linking
Design Room ONE supports OSLC APIs which allow you to create links from artifacts in OSLC-compliant tools to elements in a Design Room ONE design. For example, you can create links from elements in Jazz CLM tools (such as requirements specified in DOORS NG). In this chapter we use Jazz CLM tools as the example, but links can be created from all tools that support the OSLC APIs.
|
Note! Before links can be created from Jazz
CLM tools it is necessary to configure both the Design Room ONE server and the
Jazz Team Server so they know about each other. If
you are unable to create OSLC links, or see other problems related to such
links, make sure that your administrator has registered Design Room ONE as a
Jazz application as described in the chapter “Registering Design Room ONE
with Jazz” in the installation
instructions. |
Associating a Jazz Project Area with a Design
You need to establish an association between the project area that contains the element you want to create the link from, to the design which contains the element that should be targeted by the link. Open the Overview page of a Jazz project area, for example a DOORS NG project area:
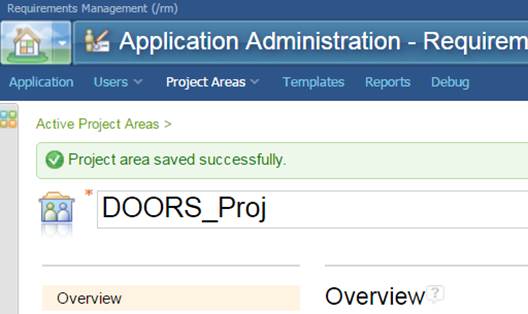
Then click Add in the Associations section at the bottom of the page.
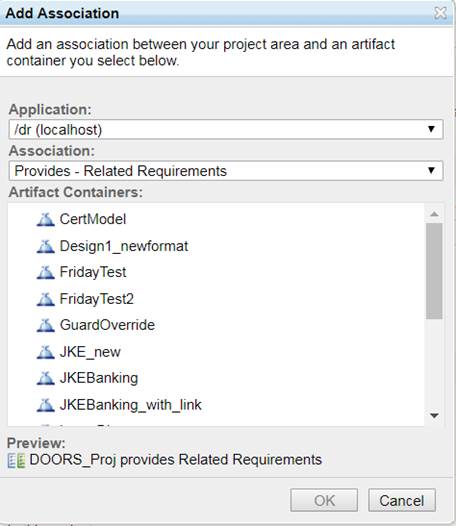
Look in the Application list and select the Design Room ONE entry (by default called /dr). Then choose the kind of association to create. These kinds are defined by the OSLC standard and specify what kind of link that should be created. Design Room ONE exposes model elements both as resources from the AM domain, and as requirements from the RM domain. Note that since Design Room ONE has a read-only representation of the model (the writable representation is in DMA/RSAD/RSARTE/RTist), it is not possible to create links that a Jazz CLM tool won’t store in its own repository. For example, from DOORS NG you can choose to create a “Related Requirements” association, since this leads to the creation of RM domain links which are stored in DOORS NG. But if you instead create a “Requirements” association then AM domain links will be created, and these links DOORS NG will attempt to store in Design Room ONE. Instead of creating links in Design Room ONE you should create such links in the modeling tool, and then export them with the model to Design Room ONE. See Exporting Requirement Links from DMA/RSAD/RSARTE/RTist for more information.
So, to summarize, if you want to create links to Design Room ONE elements from DOORS NG, add a “Related Requirements” association, and if you want to make visible in DOORS NG requirement links created in RSAD/RSARTE/RTist and then exported to Design Room ONE, add a “Requirements” association. Of course, you can add both types of associations to enable both outgoing and incoming links on requirements.
Don’t forget to save the project area when the association has been added.
Creating Links
Once the project area has been associated with a design (using the correct type of association as described above), you can now create links from artifacts in the project area to elements in the design. Use the regular user interface in the Jazz CLM tools to create links. For example, in DOORS NG it can look like this:

The Design Room ONE Explorer view will appear to let you choose the target element for the link:
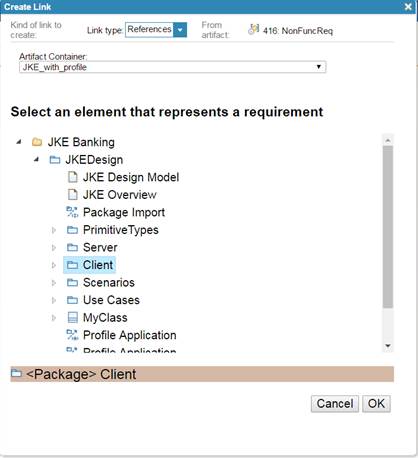
Choose the design in the Artifact Container list, and then select the target element in the Explorer view below. You can select any kind of element for any kind of link, as Design Room ONE does not impose any restrictions on which elements that could be the target for different kinds of links.
Viewing and Navigating to the Target of a Link
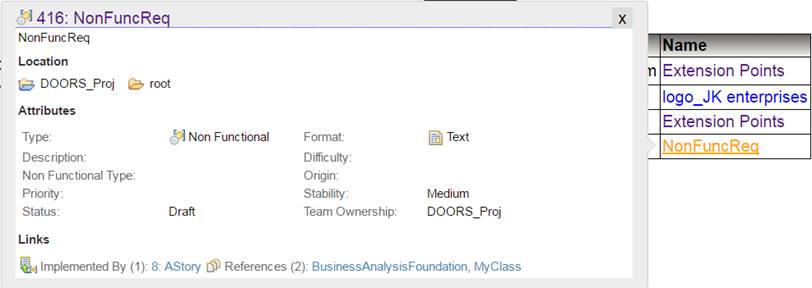
When a link has been created to a Design Room ONE element you can hover the cursor over the link to bring up a popup with information about the element. The popup contains the Properties view which shows all properties for the target element. Here is an example:
You can click the hyperlink at the top of this popup window to navigate to the element in Design Room ONE.
|
Note! In
Chrome browser the preview of Design Room ONE resources may fail if
authentication is enabled on Design Room ONE server due to default SameSite=Lax cookie policy. To address this open the
following URL in your browser and change the setting to Disabled. |
If the linked element is a diagram, you can view its contents by clicking the Show More button in the bottom left corner of the popup.
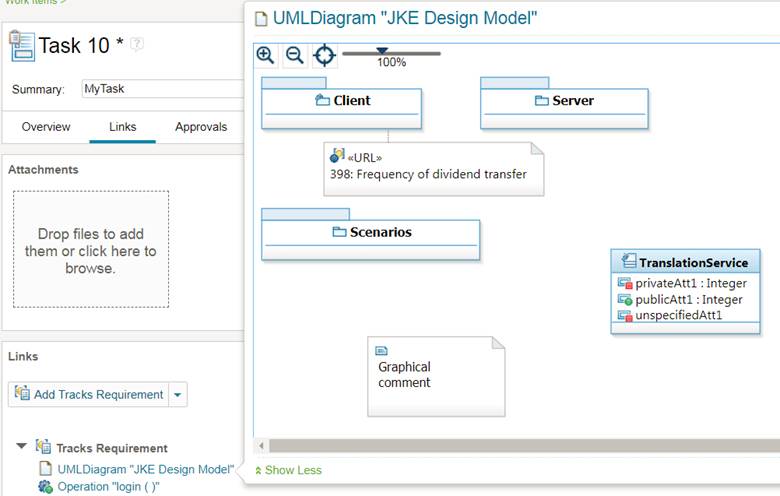
Click Show Less to go back to viewing the diagram properties instead.
Exporting Requirement Links from DMA/RSAD/RSARTE/RTist
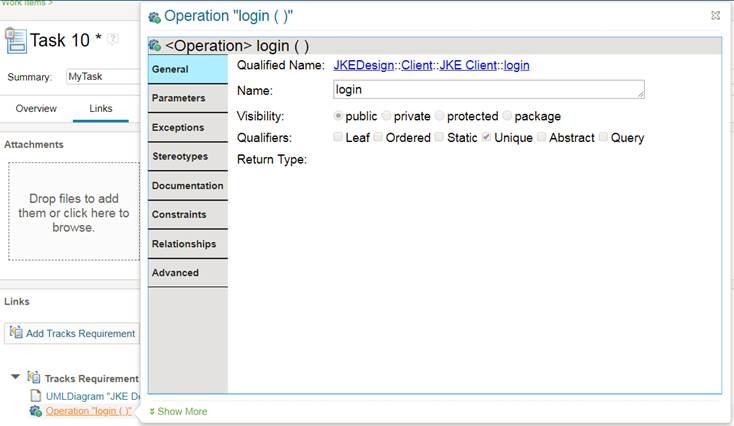
The Design Room ONE Integration plugin for DMA/RSAD/RSARTE/RTist contains a Requirements Management Integration feature which makes it possible to create links from model elements in the modeling tool to requirements in DOORS NG. The links are stored in the RSAD/RSARTE/RTist model and are shown in a special Links tab in the Properties view. If you export such a model to Design Room ONE the requirement links will be exported too, and can be viewed in a similar Links tab in the Design Room ONE Properties view.
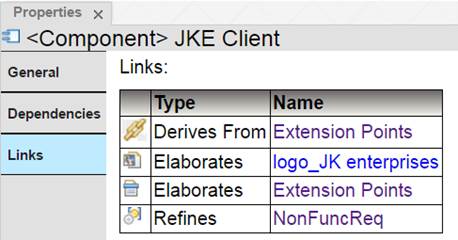
Design Room ONE fetches some of the information about the links (such as their icons) from DOORS NG, and hence you will be prompted to log in to Jazz the first time you click on the Links tab. You can also login explicitly by clicking the Jazz login link in the upper right corner in the menu bar.
If login to Jazz fails it could be because your administrator has not registered Design Room ONE with Jazz. You can check this using the Preferences command in the Window menu:
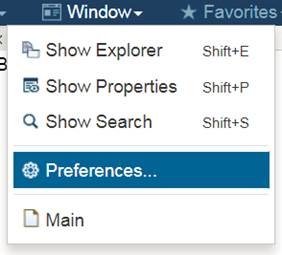
If the preference page is empty, or contains wrong information about the Jazz Team Server, contact your administrator to register Design Room ONE as a Jazz application as described in the chapter “Registering Design Room ONE with Jazz” in the installation instructions.
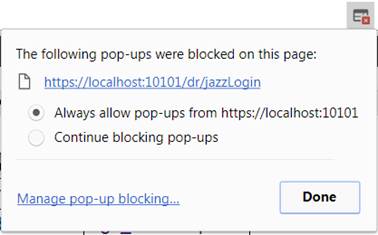
|
Note! Another reason for not getting
prompted to login to Jazz could be that your browser is configured to block
popups. Check in the browser address field if there is an indication that the
Jazz login popup was blocked. If so, change the browser settings to allow
popups from the web site. For example, on Chrome it may look like this: |
When
you have logged in to Jazz you can view additional information about a
requirement by hovering the cursor over a requirements link. The DOORS NG popup
will appear:
Design Room ONE can show all kinds of OSLC links in its Links tab, but currently only links to DOORS NG requirements can be created in RSAD/RSARTE/RTist, and hence only such links will be present in a model that has been exported to Design Room ONE.
Note that the links shown in the Links tab are AM domain links. If you want to make these links visible also in DOORS NG you therefore need to add an association between the DOORS project area and the Design Room ONE design. This association should be of kind “Requirements”. See Associating a Jazz Project Area with a Design for more information. Here is an example of what the Links tab in DOORS NG may look like for a requirement that has one outgoing RM domain link to a Design Room ONE element, and several incoming AM domain links from other Design Room ONE elements:

Global Configurations
A global configuration is a Jazz CLM feature for grouping local configurations that make sense to use together. Global configurations make it easier to set-up a consistent set of local configurations in all tools that store elements linked by OSLC links. When a global configuration is made active, links between source and target elements will be resolved using the contained local configurations that are applicable for the source and target tool respectively.
Global configurations are created in the Jazz GC application (/gc). Note that this application is an optional component of Jazz CLM that is not installed by default. Give the global configuration a descriptive name and then press the Add configurations link to add local configurations to it.
![]()
To add a local configuration from a design, first select Design Room ONE in the drop-down menu, and then select a design with a local configuration to add to the global configuration.
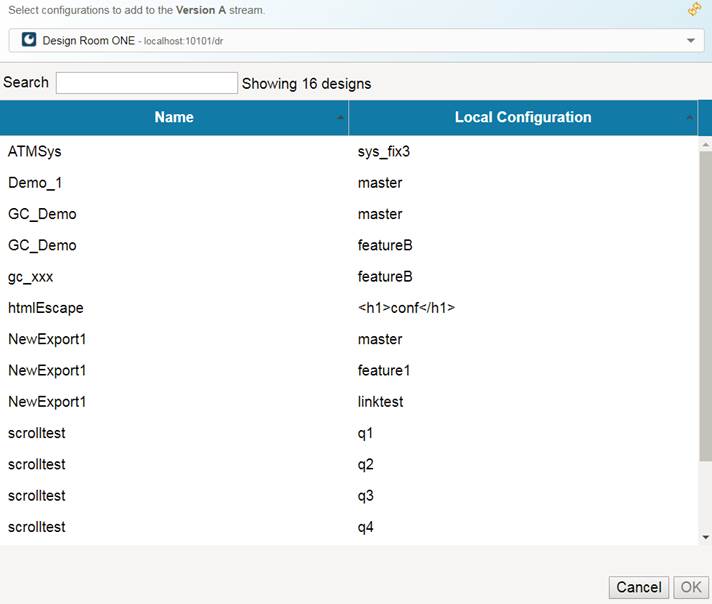
Press Select and after a while the local configuration will appear under the global configuration:
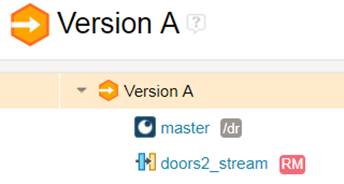
You can select the active global configuration in a drop-down menu in the Design Room ONE web application in a similar way as it is done in Jazz CLM tools. This drop-down menu appears if there is at least one global configuration defined in Jazz which contains the currently open design’s local configuration.
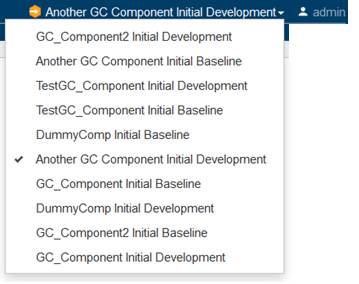
When you change the active global configuration, requirement links may resolve to different versions of requirements, according to the local DOORS NG configuration that belongs to the selected global configuration. It is therefore important that you set the correct global configuration as active. Otherwise requirement links may become unresolved, or resolve to the wrong version of the target requirements.
Reporting
Design Room ONE provides REST APIs that make it possible to create rich reports in Rational Publishing Engine that contain data from one or many exported designs. The reports can also include information that comes from other OSLC tools that store artifacts which are linked to the model elements.
For more information refer to this tutorial that describes how to use Design Room ONE with Rational Publishing Engine.
Known Limitations
Below is a list of known limitations in Design Room ONE:
1. Only UML models can be exported to Design Room ONE. Other modeling domains such as BPMN and topologies are not supported.
2. The appearance of exported models and diagrams is very similar, but not always exactly the same as in RSAD or RSARTE or RTist. For example, not all properties are currently shown for elements and there may be small differences in diagram appearance.
3. A model element can only be shown in one location in the Explorer view at the same time. If you activate multiple overlapping working sets, which would make an element visible at many locations in the Explorer view, the element can only be shown at one of these locations at the same time.
4. It is not possible to select a line in a diagram if the line does not have at least one text label.